The aim is to design a sustainable tiny house on wheels intended for multi-week travels or short stays. As the word “tiny house” suggests, it’s a functional home equipped with all basic systems and spaces to enable a comfortable living. Time to get creative it seems.
To get a detailed and accurate insight into our available space, a 3D model of the stripped bus was created using high-precision laser scanning (more details in Chapter 2: 3D scan). This virtual model is now a very powerful source of information and allows for remote detailed design. As the design progresses, we hope to share some updates of the 3D model, a virtual preview of our future bus.
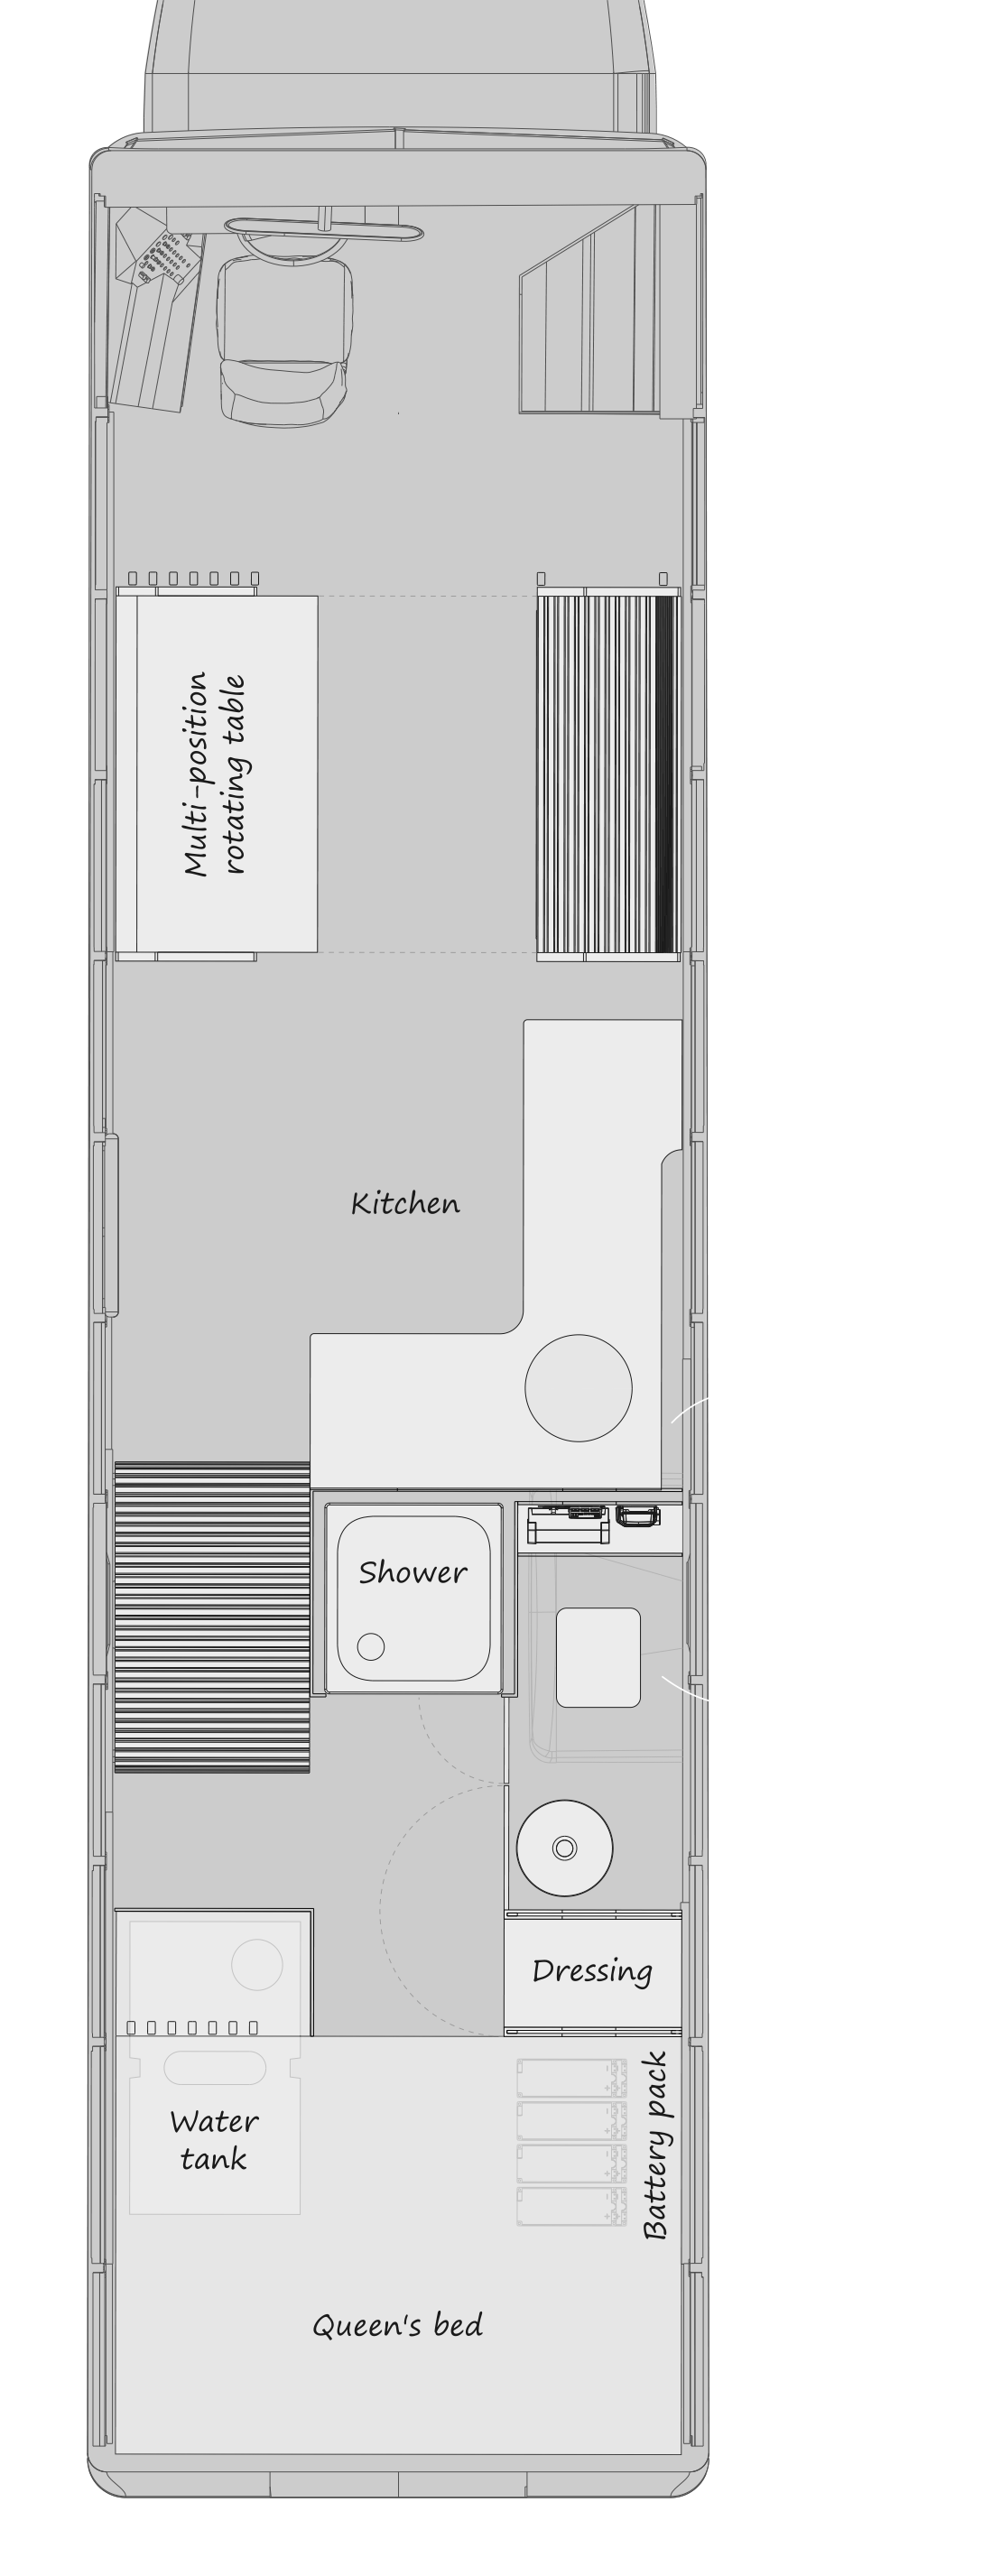
The detailed design phase starts with a basic floor plan. We opted for an L-shaped layout, making the front social area (living room + kitchen) feel as spacious as possible and create a somewhat hidden private area in the back of the bus for the bathroom and bedroom. As the original headroom is quite low (74” or 1.88m), it’s nice to have a kitchen section with maximal ceiling height and have the shower in a central location. From the outside we will try and keep the bus as authentic as possible. With the exception of a solar deck and rooftop terrace, nothing else will be modified or mounted on the exterior. The chassis (high above the ground) does however offer some great storage and hidden mounting opportunities underneath the bus.
In the section below you can find some more details on the different design tasks along with their status, general description and first ideas. Interested to get involved? Have a look at the ongoing topics and get in touch. Keep in mind our challenge is to focus on sustainability, which will guide the decisions we make during the design phase. Curious on your inputs :)
.jpg)
.jpg)
Removing the original black vinyl flooring of the bus revealed some nasty and deteriorated coatings and glue. It appears that the steel subfloor sheets were originally coated from the inside with a blackish primer and a beige paint which has lost most of its adhesion to the primer. This beige paint along with the glue residues can be easily removed through soft grinding. The plan is to recoat the interior steel subfloor and ensure a proper (steel) protection for many more years. Question is, which new primer is suitable for the project and does the original black primer need to be grinded off as well?

Two new candidate primers were selected: waterbased (D5280) vs two component polyurethane (A29-75). A coating test was performed on both the old black primer and bare steel surfaces to assess and compare the adhesion quality of both primers. Note that a bare steel surface requires more intensive grinding which we would like to avoid if possible. The cross-cut tape test and scrape test revealed some interesting results (more details in the pictures below). In short, the two component primer (white) outperformed the waterbased primer (grey) on both surfaces. Its adhesion on the bare steel was perfect, on the old black primer a little variable which is possibly related to local surface impurities or insufficient coating thickness.
Final design: Only the beige (deteriorated) coating will be removed through soft grinding. Some local additional grinding will be performed to remove impurities and rust. Two layers of the two component polyurethane primer will be applied (datasheet).
Carbon compensation: In terms of ecological impact, the two component polyurethane primer scores somewhat worse than the waterbased primer. The coating process is somewhat unavoidable here and an appropriate compensation is still being assessed.
Acknowledgement: Geert - the selection of the new primers along with the careful guidance and detailed assessment of the coating tests would not have been possible without your help and expertise.


With the interior metal sheeting removed during the stripping process, there are a lot of possibilities for a new structure and finishing. To create a "cosy cocoon" effect and limit the amount of contact or exposure with the steel structure of the bus, a wooden structure was designed. There's however one ceiling section in the bus where the original metal sheeting will return and that's the cockpit. The idea here is to keep the driver's section as authentic as possible in order to maintain some original vibes of the school bus.
Final design: The subfloor structure consists of 25mm thick plywood straps (Ecoplex, Italy) placed in line with the ribs of the bus and fixed at both ends to the lower strapping of the walls (left side allows for expansion). A modification of the structure was performed throughout the build to support the rails in the living room and the aluminium structure of the shower cubicle (see blue-colored straps). These plywood straps were additionally glued with little dots to the steel subfloor to ensure proper anchoring and minimal movement. The design aims for a mostly floating structure which can be easily disassembled for recycling purposes some day in the far future.

For the walls, 2 layers of 12mm thick plywood straps (Ecoplex) will be mounted horizontally against the steel ribs of the bus. This is to minimize the contact surface with the steel structure. The first layer will be fixed with self-tapping screws to the ribs, whilst the second layer will be fixed with simple wooden screws to the first layer. Note that in this configuration the thermal bridges are avoided. A small cable duct is foreseen just above the windows to guide and access the original and new wiring.

The ceiling structure will only consist of 1 layer of 12mm thick plywood straps (Ecoplex), this is to maximize the final headroom.
The plywood straps will be protected with an invisible, waterbased and natural wood wax from Horsemen. This company has a very interesting background and vision which is reflected in all of their products.
Carbon compensation: The plywood purchased for the project is known as Ecoplex from Panguaneta (Tutto-Pioppo), made of 100% Italian poplar veneer. The short production chain (biomass powered) and local (European) certified forest management were decisive in the selection of the final wood supplier. The gluing process of this plywood has a low formaldehyde release (class E1). For info, the company also manufactures NAF plywood (no-added formaldehyde), but unfortunately the project budget did not allow for this extra sustainable option.
Acknowledgement: The Ecoplex plywood was purchased from Groene Bouwmaterialen, which provided splendid support in the selection process.
Originally only the roof of the bus was insulated with glass wool, which was removed during the stripping process. To minimize the heat losses in the bus, an overall upgrade of the insulation is planned for the roof, walls, floor and windows. We'll further aim to minimize unwanted air leakages by sealing off small gaps and holes. Pure natural insulation materials were selected for the project, being a sustainable and recyclable alternative for the more traditional spray foaming or PU insulation.

Final design: The floor will be insulated with 25mm of expanded cork (ref. Amorim, Portugal) and has a thermal conductivity of 0,039 W/(m.K). Some advantages: the cork is moisture resistant (important in case of accidental water ingress), provides decent structural support and has acoustic and vibration damping properties. Given the limited headroom in the bus (1.88m), the final floor insulation thickness was a trade-off between additional insulation and reduced headroom or space.
The walls and ceiling will be insulated with 60mm of sheep wool (ref. Isolena, Austria) and has a thermal conductivity of 0,033 W/(m.K). This natural waste stream product has some unique additional properties: acoustic damping, humidity regulation (can absorb and release moisture up to 33% of its own weight without losing its thermal properties) and neutralizes harmful substances in the air such as formaldehyde which is present in most wood-based sheet material.
Although the sheep wool is capable of absorbing some moisture, we do want to limit the moisture transfer between the (hot) interior of the bus and the (cold) outer structures. This is to avoid possible condensation in or behind the insulation which will damage the steel structure of the bus or insulation materials over time. Hence, a vapor barrier (Pro Clima Intello) will be installed as well.
Carbon compensation: The expanded cork is claimed to be carbon negative (i.e. more carbon was absorbed during its growing process than released during production). We will however compensate for its transport from Portugal. Although the sheep wool is a natural waste product, it does have a global warming potential (GWP) linked to it. The Isolena (page 17) indicates a GWP of 0.83 kg CO2eq / kg Isolena sheep wool and also includes a comparison with glass wool and rock wool. An additional compensation will be considered for the transport from Austria. The only non-natural material is the vapor barrier, which is unfortunately difficult to avoid and an appropriate compensation is still being assessed.
Acknowledgement: Above natural insulation materials were purchased from Groene Bouwmaterialen, which provided splendid support in the selection process.
The original sliding windows are a key design feature of the bus giving its authentic and unique look. A lot of design efforts were done finding different solutions to upgrade the insulation and air tightness of these windows. A long considered solution was installing a second row of windows from the inside of the bus, integrated into the wooden shell structure. A tricky aspect and challenge was however accessing the interior windows for cleaning, which meant the glass had to be easily accessible and removable. In addition, the fixation of the glass had to persist the vibrations and shocks whilst driving. It's probably clear by now this solution was not straightforward.
A second long considered solution was to keep the original aluminium window frames and replace the 2 smaller panes by a single vacuum glass (Fineo, AGC). This vacuum glass is double-paned (2x 3mm) and is separated by 0.1mm of vacuum through small 3D printed dots. The insulation properties of this very thin glass are identical to triple-paned standard windows (U = 0.7 W/(m2.K). Although this solution was technically feasible, it was discarded in the end as this innovative glass was not yet certified for automotive use (ECE R43).

Final solution: Sometimes your search ends where it started; the original sliding windows of the bus are just too unique and authentic to replace. Thinking about it, being able to open/close every window is maybe an unbeatable feature? For winter times, we have some first ideas of a removable solution (kind of insulated curtains fixed with magnets) to avoid direct contact with these cold window surfaces where needed. We’ll wait with the further development for the time being and first gain some winter experience in the bus ;)
Acknowledgement: Bart (2B GlasTechnieken) - without your help and expertise we would not have been able to explore these unique glass solutions.
With the insulation tucked behind or inside the wooden strapping, it's time to cover and finish the interior of our cosy cocoon.
Final design: The subfloor will be covered with 6mm thick plywood sheets (Ecoplex, Italy) to even out any bumps or irregularities. As final flooring, we have selected a linoleum based material (Forbo, Marmoleum Click) which provides a natural, durable and easy-to-install flooring solution.

The walls will be finished with 12mm thick plywood sheets (Ecoplex) whereas for the roof we will use 6mm thick flexible plywood sheets (Ecoplex) to preserve the curvature of the roof structure.
All visible or exposed woodwork will be protected with a natural wood wax with a slight white pigment (Osmo 3044).
Carbon compensation: The plywood purchased for the project is known as Ecoplex from Panguaneta (Tutto-Pioppo), made of 100% Italian poplar veneer. The short production chain (biomass powered) and local (European) certified forest management were decisive in the selection of the final wood supplier. The gluing process of this plywood has a low formaldehyde release (class E1). For info, the company also manufactures NAF plywood (no-added formaldehyde), but unfortunately the project budget did not allow for this extra sustainable option.
Acknowledgement: The Ecoplex plywood and natural wood wax was purchased from Groene Bouwmaterialen, which provided splendid support in the selection process.
With the exception of the engine and diesel (HVO) heating system, everything else in the bus will be electrified. This means that we’ll need an advanced and robust system allowing to connect and integrate all subsystems (solar modules, solar controller, battery storage, inverter, battery charger, shore power, etc). To build this central system, we’ll be using Victron Energy products, a well-known and high-quality supplier of off-grid electrical solutions.
Final design: A technical area or wall is foreseen in the back of the toilet. This is a central and easy accessible location but at the same time somewhat hidden away. Any audible noise from the inverter should thus be limited in the living or sleeping areas. Based on an initial assessment of the AC and DC loads in the bus, following products from Victron Energy were selected and purchased from Dobbelaere-AE (an official and local dealer of Victron Energy):
- Victron MultiPlus-II 48V 5kVA 230V
- Victron Cerbo GX
- Victron Lynx Distributor (2x)
- Victron Lynx Shunt VE.Can
- Victron SmartSolar MPPT 150/35
- Victron Orion-Tr 48/12-30 (360 W)
- Victron Orion-Tr 48/24-16 (380 W)
- Victron GX Tank

The final fuses, switches, cables, clamps, etc. will be selected and purchased at a later stage.
Carbon compensation: These are all new products, an appropriate compensation for its production and transportation is being assessed.
Acknowledgement: As this electrical system is the core of the bus (no electricity, no fun), it's been very reassuring to have Donald from Dobbelaere-AE follow up on the design together and provide very valuable expertise and user experience.
PS: EXPLORIST.life has some great youtube content on DIY camper electrical system installs.
As electricity is our main energy demand, we will definitely need a sustainable and off-grid power supply source. The front roof section of the bus (up until the emergency hatch) is an ideal location for a solar deck. We initially had in mind to design an adjustable tilt structure, but were advised it's not worth the time, efforts and risk.
A critical design aspect was how to fix the solar modules on the roof of the bus. We spent numerous hours looking up different systems and possibilities. As safety played a crucial role (you absolutely want to avoid the solar modules coming loose whilst driving), we decided to contact our local professional partner Mobietec, specialized in the manufacturing and installation of roof rack systems.
Final design: Three large bifacial solar modules will be installed (ref. Meyer Burger Glass). Some key specs: 380 Wp (rated power), 120 half-cells, monocrystalline n-Si, HJT (heterojunction) cells, 1722 x 1041 x 35 mm (dimensions), 24.4 kg (weight). Given the solar modules will be permanently fixed in horizontal position, we hope to gain some additional output through the reflection on the roof of the bus (hence the choice for bifacials). The overall installed capacity as such is 1.140 Wp.

The primary structure of the roof rack system consists of two aluminium extruded rails (type MT515-BL, 7.6 m each) mounted onto the roof by custom L-shaped stainless steel brackets (98° angle to be precise). An additional crossbeam (same extruded profile as the rails) will be mounted before and after the solar array in order to fix all solar modules with standard middle clamps. The first crossbeam will have two additional functions; protect the solar array against any (potential) horizontal impact during driving and allow for the option to install a spoiler or wind deflector in case of heavy vibrations (resonance) at cruising speeds.

More details and pictures of the installation in Chapter 8 and Chapter 9 of the build.
Carbon compensation: The solar modules from Meyer Burger are manufactured in Germany (and designed in Switzerland). It's not yet clear what amount of carbon compensation is required to offset its initial production. We will however compensate the transport from the manufacturing plant in Germany (Freiberg or Bitterfeld-Wolfen).
Acknowledgement: Brecht - without your procurement and logistic support we would not have been able to select these specific solar modules for the project. Hans & Rik (Mobietec) - thanks for helping out with the final design and custom parts.


It's anticipated that the bus will be stationed mostly off-grid. To ensure electrical power supply, even in days with limited to no sun, an adequate battery pack will be installed. This particular design is one of the key examples of our focus on sustainability in this project. Considering the significant ecological and carbon footprint of newly produced batteries, we instead opted for second-life EV batteries (EV = electric vehicle). These “end-of-life” battery packs (for transport purposes) usually still have a capacity of over 80%, making them ideal for stationary energy storage applications where weight/volume vs capacity is less critical.
Final design: The initial battery pack design consists of 6 second-life Porsche Taycan battery modules. Some quick module specs: 2.86 kWh (capacity), 22.2 V (nominal voltage), 12 kg (weight), 390 x 150 x 110 mm (L x W x H). These modules will be arranged in a 48 V configuration. A custom BMS (= battery management system) was developed by wdrautomatisering to control and monitor the battery pack. The BMS is capable of communicating with the Victron Energy system. Further extension of the battery pack is possible should this be desired in the future.

The modules itself will be mounted indoor underneath the bed and near the central electrical system of Victron Energy. The advantage of indoor installation is better protection against environmental conditions (incl. freezing temperatures) and monitoring of the battery conditions. The modules have a mounting hole in every corner (very practical) and will be used to fix the modules to the aluminium framing.
Carbon compensation: As these are second-life components, no compensation is accounted for its original production. We do however take into consideration the transportation from its storage warehouse to the bus and back, roughly 572 km or 42 kg CO2. An emission factor of 1.326 kg CO2/ton/km was applied (source).
Acknowledgement: This somewhat showcase design using second-life EV batteries would not have been possible without the support and expertise of Walter from WDRAutomatisering.


The thought of having breakfast or dinner on top of the bus, or stargazing at night seems incredible. As part of the solar deck design, a roof rack system from Mobietec will be installed over nearly the entire length of the bus. Towards the rear (behind the ventilation system) we still have some space left for an epic rooftop terrace ;)
Final design: The rooftop terrace will consist of an aluminium frame constructed from Mobietec extruded profiles (type MT712-BL and MT515-BL, black edition) into which 3 wooden panels will slide. The wooden panels will be recovered from an old wooden garage door and coated with an ecological weather-resistant protection from Rubio Monocoat (DuroGrit, color: grassland beige).

Some low permanent safety guides will be installed as initial protection (or peace of mind :D) when you’re up on the bus. Additional removable guides will be assessed at a later stage, but it’s probably more of a sitting or lying terrace anyway. With a total size of 3.02 x 1.72m (identical width as the solar modules), there’s quite some space on the highest point of the bus ;)
Access to the rooftop terrace will be via a removable ladder placed against the side of the bus (nothing too special, just a little adventuruous). For more installation details and pictures see Chapter 19 of the build.
Carbon compensation:
Acknowledgement: Hans & Rik (Mobietec) - thanks for helping out with the design and optimization of the frame structure.

As the available storage area is limited in the bus, we'll need to optimize and use every little corner or space.
First ideas: There was this initial idea of creating additional sub-floor storage. This however requires making additional openings in the steel floor, which we want to avoid. At a later stage during the build, it might be worthwhile to investigate left-over and convenient spaces which we might use for extra storage. (to be continued)
Carbon compensation:
With the cosy cocoon in place, the interior framing and subdivision of the bus can be designed. A common and lightweight choice is wooden framing (usually young spruce wood). A likely risk and issue with wooden framing is deformation and twisting over time. This can be avoided by using (tropical) hardwoods or extensive gluing but doesn't feel like the most sustainable and circular option.
Final design: The primary structure of our Queen’s bed, shower cubicle and technical walls will be constructed from 40x40 mm extruded aluminium ISB profiles (ref. Easy Systems). These profiles have a custom slot at all four sides which allows for an easy interconnection and assembly into a very rigid and strong structure.
The bedframe structure is extended on the left side to encapsulate the water tank and contains additional interior framing on the right side to mount the battery modules. The framing of the shower cubicle and technical walls were optimized throughout the build based on the final shower surface and technical components. For more installation details Chapter 15 of the build.

Carbon compensation: The aluminium framing design allows for easy disassembly and segregation of the raw building materials in the (far) future. This circular, sustainable and recyclable aspect was an additional trigger to choose for the aluminium framing. The aluminium profiles do have a non-negligible carbon footprint linked to their initial production, hence a suitable carbon compensation is being assessed.
Acknowledgement: Jan - brilliant in the design and construction of large machinery, was so kind to review and assess this (relatively simple) aluminium framing design and provide some very valuable suggestions along with mounting techniques.
At the heart of the bus will be the living room, a multi-purpose space. We envision a cosy seating area to meet up with people, a dining table for 6 persons, an extra double bed (for friends to sleepover :D) and a comfortable work space. Along with the outdoor landscape views, this space will hopefully allow for an intense connection with people, boost your creativity whilst working or simply let you dream away :D
Describing this multi-purpose space is easy, converting it into a real design is less straightforward. It was clear this was not within our capabilities and would require a unique craftsman with specific skills, creativity and passion for one-of-a-kind projects. Allow me to introduce Sander from Atelier Zorro.
Final design: Above animation (credits to Sander) shows the possible setups of the living room. The basic or driving configuration is with the table fixed at the left side and the sofa at the right side of the bus. Sliding the sofa towards the table creates a spacious working desk. The table top and table structure can both rotate 90 degrees, creating a kind of coffee table configuration. Unfolding the left bench and sliding the sofa against the table top creates an extra double bed (sleeping configuration). Reversing above steps and simply sliding the table towards the center creates the dining configuration (or office space for multiple people). Off-record, unfolding the left bench with the coffee table configuration, creates a lazy lounge for movie nights :D This might sound and look like magic, but it’s real (see Chapter 23 of the build).
Carbon compensation:
Acknowledgement: Sander (Atelier Zorro) - we're incredibly grateful for this collaboration and your countless inputs, contributions, dedication and passion to the project.
It’s not our intention to cook 3-star menus in the bus :D However, the kitchen space should be functional to cook some delicious meals, store fresh food and drinks at cooled temperatures, wash the dishes and provide a decent amount of storage space (it’s never enough).
Final design: A first glimpse of the overall design of the living room and kitchen is shown in the rendering below (credits to Sander from Atelier Zorro, will let you gaze for a moment). To make the construction of this unique design as sustainable as possible, we decided to purchase second-hand parts and appliances only (they give more charm and story to the project as well):
- fridge: indelB Cruise 130 (from Bram)
- sink: FRANKE Rondo Rox (from Barts)
- combi-oven: Miele H 5040 BM (from Dentergem)
- induction cooktop: Miele CS 7612 (from Caroline)
- faucet: FRANKE Atlas Neo (from Sonja)
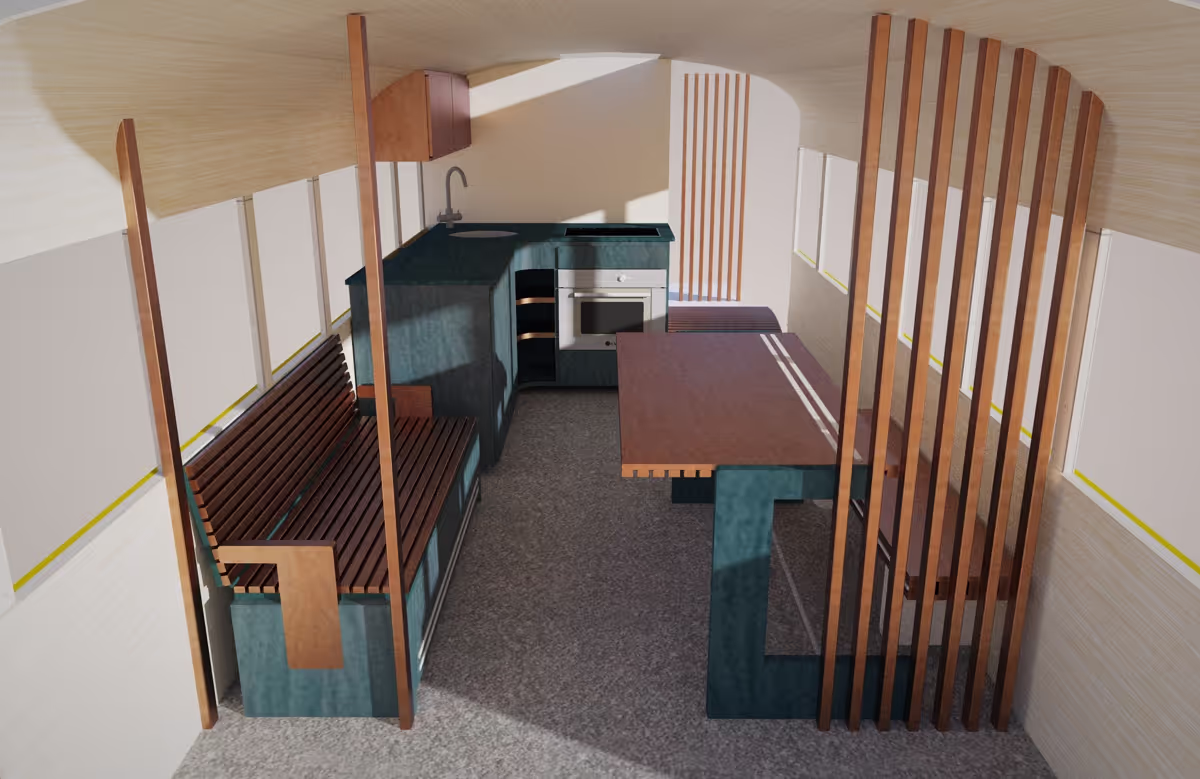
The fridge (with an 8L freezer compartment for ice cream :D) is conveniently located next to the sofa and as far as possible from the hot appliances. The combi-oven and induction cooktop are located centrally for maximal ceiling height and just below the ventilation system (extraction).
The countertop has a somewhat organic shape and provides a neat opening along the windows and part of the central wall for some garden elements (herbs, flowers, ..), quick storage of kitchen equipment whilst driving and a convenient access point to the expansion tank of the hydronic heating system (for monitoring and refilling).
The overhead cupboard provides additional storage space and has an integrated LED strip for additional lighting of the kitchen space. Curious to see how it looks in real life? (see Chapter 23 of the build).
Carbon compensation:
Acknowledgement: Sander (Atelier Zorro) - we're incredibly grateful for this collaboration and your countless inputs, contributions, dedication and passion to the project.
Waking up surrounded by nature and having windows pretty much all around you to enjoy the magical views is a must :) The rear two sections (or windows) of the bus are an ideal space for our bedroom and in principle large enough to fit a queen's bed (160 x 200 cm).
Final design: The bedframe is constructed from aluminium ISB profiles (see design Aluminium framing) and has a height of 64 cm from the ground, just above the fresh water tank. This creates a useful space underneath the bed for the battery pack, two large drawers underneath the central access to the bedroom and extra storage space (trunk) accessible from the outside of the bus.

A well-ventilated platform for the matrass(es) will be constructed from 18mm thick plywood (poplar) sheets with a grid of holes. A wooden finishing (Ecoplex) will be applied to cover all visible aluminium framing to create a warm and coherent interior.
A tall narrow dressing (storage space) is foreseen on the right side, whilst the left side will be partially finished with vertical slats. This is a unique returning design element (see design Kitchen) and preserves the full-depth view and feeling of the bus. The result of both elements (dressing - vertical slats) is a kind of open gateway to the Queen’s bed of the bus and makes the bedroom somewhat more hidden and private as well.
The sleeping orientation would be transverse with your head towards the right side of the bus (dressing), although the large size of the bed might allow for any orientation :D
Carbon compensation: See design Aluminium framing.
Acknowledgement: Sander (Atelier Zorro) - design of dressing, vertical slats and Queen’s bed platform. Helmuth - optimization of aluminium bedframe structure.
A warm shower is heaven and definitely not to be excluded from the design. As we wanted to maximize the headroom and showering comfort, the shower is located in the center and near to an air extraction point.
Final design: To avoid water spilling in all directions in the bus or making everything wet in the toilet/bathroom, a separate shower cubicle will be constructed (part of the aluminium framing).
We opted for the SANIDUSCH shower tray from KALDEWEI. Its sleek and timeless design, along with the extremely resistant, durable and sustainable steel and enamel finish makes it a perfect match for the project. This elevated shower tray is somewhat vintage these days but has many advantages in our case; the open and accessible space underneath allows for passage of additional ductwork, electrical cables, etc. and the shower tray is somewhat forgiving should the drainage system clog or fail.

Finding a sustainable and ecological shower wall finishing was not straightforward. The non-stationary application of the bus didn’t help :D In the end, we found a very neat compromise; a seamless U-shaped multi-layer acrylic shower wall (Saetfix). The single-piece design avoids long vertical seams in the corners, which could potentially leak overtime due to vibrations and torsion of the bus. The multi-layered production process makes the acrylic sheets very flexible, which was necessary to get it turned vertically in the bus. An additional acrylic sheet will be fixed to the ceiling making the cubicle completely waterproof. Side note: a lower height of the shower wall structure (compared to the ceiling height of the bus) was required to get it turned vertically in the bus, another practical reason we opted for the elevated SANIDUSCH shower tray ;)
For the shower door, we selected the Vega folding door from Arblu (Italy). The company allows to customize the door height, was which crucial in our case. The folding door slides in an aluminium frame structure, which makes the door and shower cubicle more robust whilst driving and avoids the shower door from swinging inwards/outwards. A folding door concept is also very efficient in terms of required space versus door opening.
Last but not least, a compact vertical thermostatic shower faucet (Terza) was found, commonly used for tiny house applications with limited shower space. The vertical design allows to place the shower faucet towards a corner, maximizing the shower space and avoiding an annoying structure in your back :D (it looks very cute as well)
More details on the shower installation and finishing in Chapter xx of the build.
Carbon compensation:
Acknowledgement: Deborah, Jana, Sina & co (KALDEWEI) - a very inspiring company and team sharing a similar vision on sustainability, quality and design. Their incredible dedication and support was a crucial step forward in the realisation of the project, very grateful. Bjorn (Saetfix) - thanks for the numerous exchange on the feasibility of the shower wall solution. Thomas G - thanks for sharing your practical expertise and ideas.
The rear wheel wells are often tricky to integrate into the design as they stick out more than 20 cm above the steel subfloor and have this large curved shape. This raised area however seems like an ideal location for the toilet, the throne or king's seat of the bus :D
Final design: To avoid additional plumbing and a separate black water tank, we opted for a composting toilet (Trelino Evo S). A horizontal platform (the throne) will be constructed above the right wheel well to mount the toilet in a stable position. Access to the toilet room will be via two hinging doors in between the shower cubicle and dressing (see general floor plan as well).
A nice design feature; the MIENA washbowl from KALDEWEI will be integrated in the door panel hinged to the dressing. Given the tight space in the toilet room, you will be able to swing out the washbowl 180° against the dressing creating a more spacious bathroom setup in the central section of the bus (with maximal headroom). When not in use, the washbowl is efficiently hidden in the toilet room and doesn’t take up much (passage) space.

Note that the emergency window is conveniently located next to the toilet and opens via a top hinge, enabling additional ventilation should it be needed :D
Carbon compensation:
Acknowledgement: Deborah, Jana, Sina & co (KALDEWEI) - the washbowl will be another neat design element in the bus, very curious to see it in real life. Sander (Atelier Zorro) - glad we can count on you again for the rear section of the bus ;)
Fresh water, both hot and cold, seem essential for a comfortable living. To allow for remote and extended adventures, a decent amount of water storage will be required onboard of the bus. In the end it's all about being careful and efficient with your water usage.
Final design: A big bus allows for a big fresh water tank, hence a 450 liter food-grade MDPE water tank (from Wydale Plastics Ltd) was selected for the project. This water tank is rotationally moulded as a single piece and has a central baffle to reduce sloshing whilst driving. The water tank will be installed indoors (for better protection against freezing temperatures) and near the rear axle (left side) for better load distribution. Given its length of 115 cm, the tank will partially slide underneath the bed. A Wema S3 level sensor (in combination with the Victron GX Tank) will monitor the status of the tank.

A water pump (LILIE SOFTSERIE) will supply the cold fresh water to the bathroom, shower, kitchen and boiler. Some technical specs: membrane pump, 11.3 L/min (max. flow rate), 2.1 bar (max. pressure), 12 V (power supply), no pressure compensation tank is required for the SOFTSERIE version. AquaLock push-to-connect fittings along with 15mm PE tubing (blue = cold, red = hot) from Watts will be used to (inter)connect the fresh water tank with the different outlets (tap-off points).
In the corner of the kitchen, hidden in the cabinetry, a hot water boiler (Isotemp Square 16) will be installed. The boiler allows for both electrical heating (750W) and diesel (HVO) heating via an internal heat exchanger (see design Climate control as well). To limit the hot water temperature at the outlet of the boiler, a thermostatic mixing valve will be installed.
The grey water tank (collection of waste water, not to forget) will be mounted underneath the bus (same location as the fresh water tank) and fixed to the chassis. The capacity of this tank will be somewhat smaller though, roughly 200 liter.
Carbon compensation:
Acknowledgement: Cedric (Vanderer), Wim & Christof (Auto Electro Andries) - thanks for sharing your professional knowledge and providing useful tips regarding water supply and plumbing in a van or bus.
Belgium has a rather mild climate; it tends to freeze a couple of times during winter, whereas temperatures above 30°C are limited during summer. However, we never know where the adventure might take us, so we should be prepared for both moderate cold and moderate hot climates. Sahara or North Pole expeditions might be a little too extreme in this case :D
Final design: In terms of heating (most important), both an electrical system and a diesel (HVO) system will be installed. For the electrical system we opted for the innovative floor heating from Karbonik. This system consists of ultra-thin foils (0.4 mm thick) with embedded carbon strokes. When connected to a 230V power supply, these foils transform into a radiant heating surface, providing a warm nice feeling at your feet (you’re never cold if you have warm feet :D). The foils are available in different widths (50 and 80 cm) and power outputs (80, 100 and 125 W/m2) and are claimed to be 100% recyclable. In terms of required space (pretty much none), this is an ideal solution for tiny house concepts and in case of renewable electricity, it’s a very sustainable solution as well. For the bus, the design foresees five separate foils with a total area of 5.7 m2, 125 W/m2 of power output, or thus a little more than 700 W of electrical floor heating. This system should hopefully be suitable for mild outdoor conditions or short trips with sufficient battery level.

For the diesel (HVO) system we opted for the hydronic solution of Webasto. A small burner (Thermo Pro 90) mounted underneath the bus will heat up a coolant (glycol) to 65°C and circulate this coolant to small air heat exchangers (Silencio, 2-speed, 1.7 kW max) installed inside the bus. A custom stainless steel casing was designed to protect the burner from all sorts of weather conditions, especially since it’s located near the rear wheels. An advantage of this hydronic system is that the hot water boiler (Isotemp Square 16) can be included in the same heating loop. The 3-way valve will allow to bypass the air heat exchangers and only heat up the boiler (useful in summer). A small expansion tank (6 L) needs to be mounted at the highest point of the circuit, allowing for expansion of the coolant and evacuation of trapped air during initial filling and operation of the system.

We applied one modification to the expansion tank and process flow; rather than having the coolant run constantly through the expansion tank (very effective in terms of removing air), we only connected a single branch to the tank. This makes it a bit more difficult and tricky to remove the initial air in the circuit (air bubbles need to divert to the tank), but avoids a continuous flow and heating of the tank during operation (you don’t want the cabinetry heating up too much or the main inverter at the other side of the wall).
To size the required heating power for the bus, we performed some theoretical heat loss calculations (thanks Toon), however, most of the heat losses are expected through the sliding windows and doors, which are difficult to model. A rule of thumb for (large) vehicle applications is 200 W/m3 (of heating volume). For the bus, with an interior volume of roughly 36 m3, this results in an estimated 7200 W of heating power required. The Thermo Pro 90 has a heating capacity of 1.8 / 7.6 / 9.1 kW depending on the operating mode (part load / full load / boost) with a corresponding fuel consumption of 0.2 / 0.9 / 1.1 L/h (shouldn’t be an issue with a 65 gallon or 246 L main fuel tank :D).
In winter times, we’re playing with the idea of removable insulated curtains to avoid direct contact with the windows and limit the air leakages. This can only make it warmer and more cosy in the bus ;) Space wise it was quite a challenge to get the coolant and heat neatly distributed in the bus, find out more in Chapter 21 of the build.
In terms of cooling, an active ventilation system (MaxxFan Deluxe) will be installed. No permanent air-conditioning solution is currently foreseen. In summer, a mobile air-conditioning unit could be placed inside the bus, blowing its hot air via the shower and extraction channel to the exterior or via one of the sliding windows.
Carbon compensation: Initially the aim was to design a full-electric heating system using efficient heat pumps, however, the required heat load in cold winter conditions is simply too large (doesn't surprise in a way). As not all processes can be electrified (is sometimes also not the most sustainable option), the diesel heater will run on HVO (100% renewable diesel) similar to the engine of the bus. There's a small carbon footprint linked to this biofuel, which should be compensated for during the lifetime of the bus. It's however a very clean alternative to fossil fuels and an ultimate combo of a high-density energy carrier, sustainable fuel and limited carbon emissions.
Acknowledgement: Toon - thanks for initiating and assisting with the heat loss simulations of the bus ;) Bart, Nathalie & Iyasu (Karbonik) - thanks for the excellent technical support with the innovative floor heating. Wim & Christof (Auto Electro Andries) - thanks for sharing your professional knowledge and support regarding the hydronic heating of a bus.
Proper ventilation is critical to ensure continuous fresh air in the bus and extract humid air to avoid interior condensation. Although the bus provides plenty of options for natural ventilation (e.g. opening a series of windows), we opted for an additional active ventilation system. Trying to avoid additional cuts in the roof or bodywork of the bus, we decided to repurpose the central emergency hatch (providing a big opening to the exterior) into a ventilation system. One downside, no more access to the roof via this hatch :D
Final design: The ventilation system will be a Maxxfan Deluxe from Maxxair, which is a 10-speed roof-mounted fan allowing for both extraction and intake up to 1500 m3/h. As the required opening for the Maxxfan (40 x 40 cm) is somewhat smaller than the existing hatch opening, a transition piece needed to be designed. The 3D scan of the bus was very useful to determine the local curvature of the roof and design these custom parts (will be laser-cut from Trespa material later on).

The Maxxfan will have a multipurpose use in the bus; besides its primary function as a ventilation system, it is centrally located above the kitchen (by design), transforming into a cooker hood when needed. The shower cubicle is another important source of hot humid air which you want to extract whilst showering. It seemed like a logic idea to create a kind of extraction channel somehow connected to the main ventilation system (avoiding an additional opening in the roof). The design of this custom ventilation duct was however a little less logic, especially since the Maxxfan had some tight fitting tolerances and you have to be able to regulate the flows (general ventilation versus shower extraction. In addition, we also wanted to integrate a grease filter to keep the fan clean, challenges enough?
It turned out to be a pretty sophisticated ventilation system :D More details and pictures in Chapter 11 and Chapter 22 of the build.
Carbon compensation: ongoing
Acknowledgement: Cedric (Vanderer) - thanks for sharing your professional knowledge and experience regarding ventilation in a van or bus. Koen, Kristof & Thibault (De Vroe Metals) - thanks for accepting the challenge of manufacturing this custom ventilation duct and supporting with the design.
Coming from the renewable industry as project engineer and driving electric for a couple of years now, I initially wasn’t too keen on driving around with a V8 7.3L diesel engine from 1996 (despite the iconic look and feel of the bus). At some point it popped up our minds to convert the bus into an electric one. A quick calculation on the required battery pack for a basic range of 300-400 km soon made us realize this was not an option for the bus (with the current batterytechnology). The ecological impact and cost of this gigantic battery pack would be difficult to justify as well.
Instead, looking at the alternatives for heavy duty transport, we came to know HVO100 (hydratedvegetable oil) also known as “renewable diesel”. This fuel is produced from 100% renewable waste streams and blended with hydrogen in a specific process to create the renewable diesel. It’s claimed to reduce the CO2 emissions by 90% compared to conventional diesel. It’s a little more expensive at the station (as somewhat expected) but perfectly fits the project philosophy and allows for some great mileage with a single full tank (65 gallon or 246L).
First ideas: We would like to go even a step further here and are currently looking into the option to install some additional EGTS (exhaust gas treatment system). The idea would be to install a diesel particulate filter which we would regenerate manually from time to time by dismounting the filter and placing in a small industrial oven.
Carbon compensation: We still need to compensate for the remaining 10% of CO2 emissions somehow. We keep track of all trips with the bus, have a look at the project overall statistics.
The aim is to keep the driver's front section (or cockpit) as authentic as possible, maintaining some original looks and vibes of the school bus. After 26+ years of operation, the cockpit could however use a little restoration and upgrade.
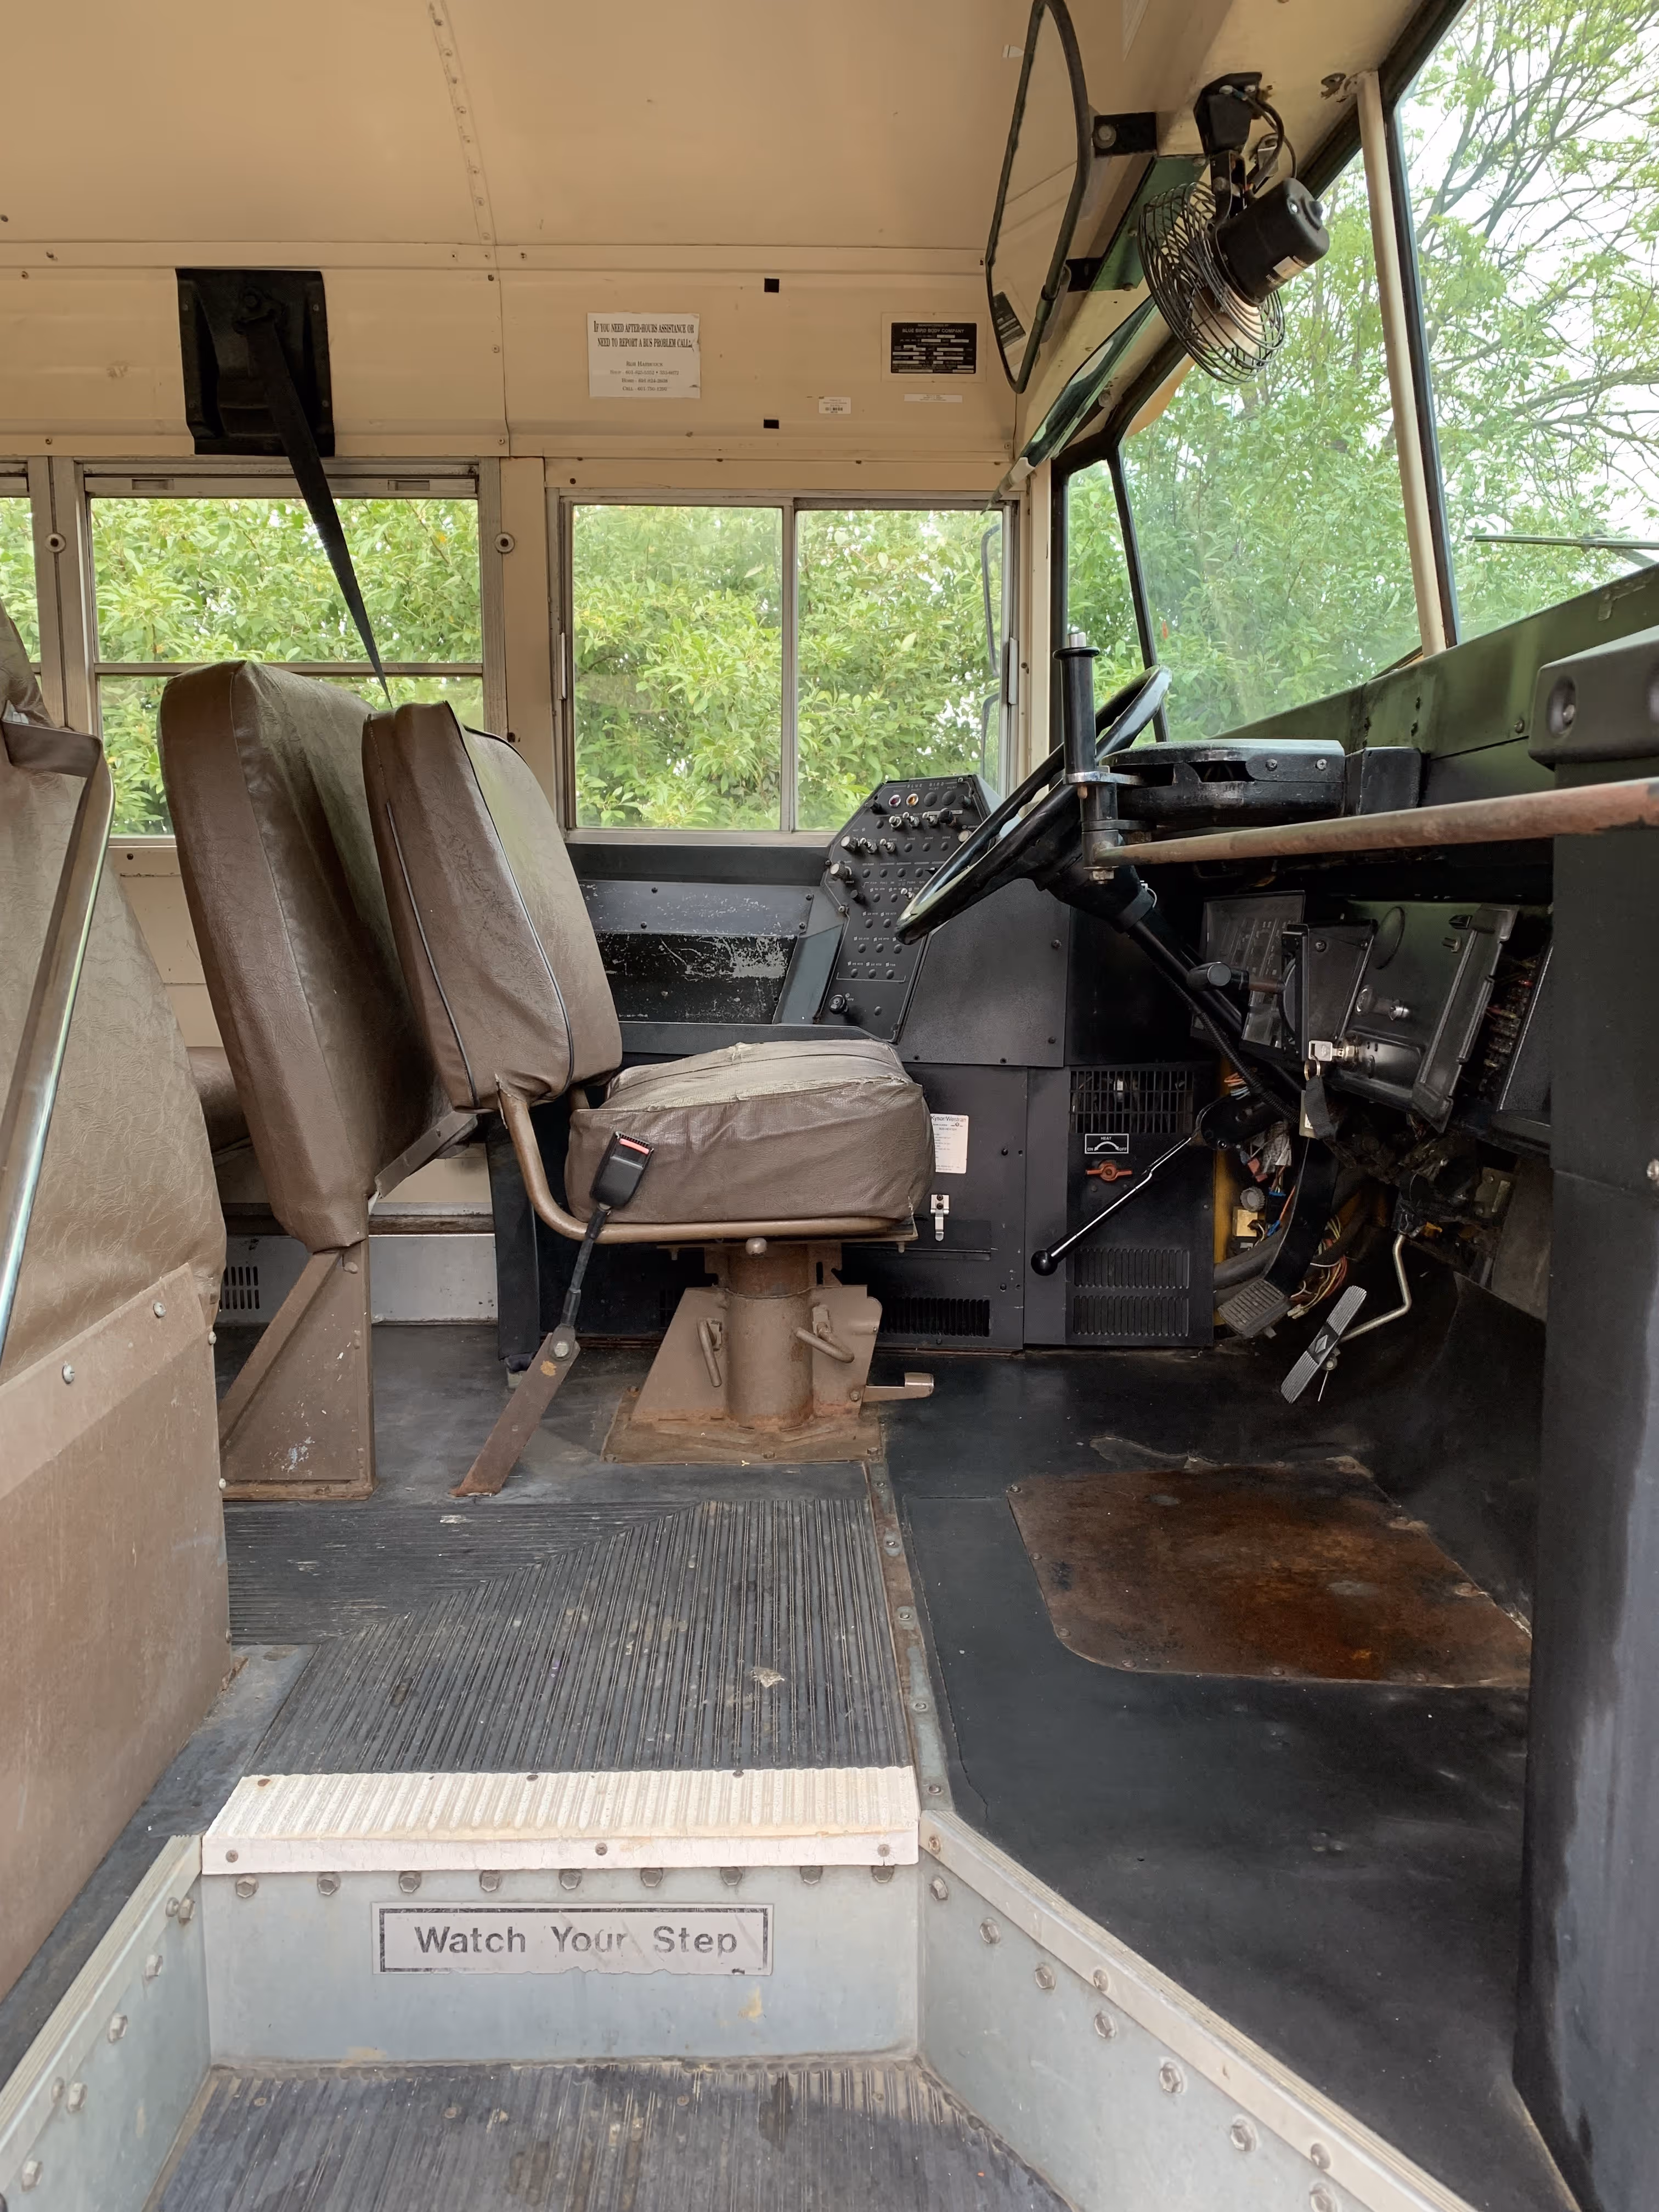
Final design: The original black vinyl flooring in the cockpit area was removed and will be replaced by linoleum (Forbo, Walton Marmoleum), a natural and durable alternative. The iconic driver’s seat will definitely remain, be it in a refurbished edition with a new touch of paint and a special new cover (the current cover is cracking apart, solved in the past with some glue :D). Most of the cockpit parts will remain untouched (keeping the vintage charms of ’96), except for a few parts affected by rust or with more scratches than paint. These parts will be recoated by our professional partner Metalys. During the intensive cleaning of the cockpit, we noticed that some of the cockpit ventilation hoses had fully deteriorated and will need to be replaced. A final technical upgrade of the cockpit and bus is a rear camera, which should be very useful whilst driving and manoeuvring given the partially blocked rear windows in the future. More details and pictures in Chapter xx of the build.
Carbon compensation:
Acknowledgement: Mom, Nancy & Natascha - the refurbished driver’s seat is a special gem in the bus.